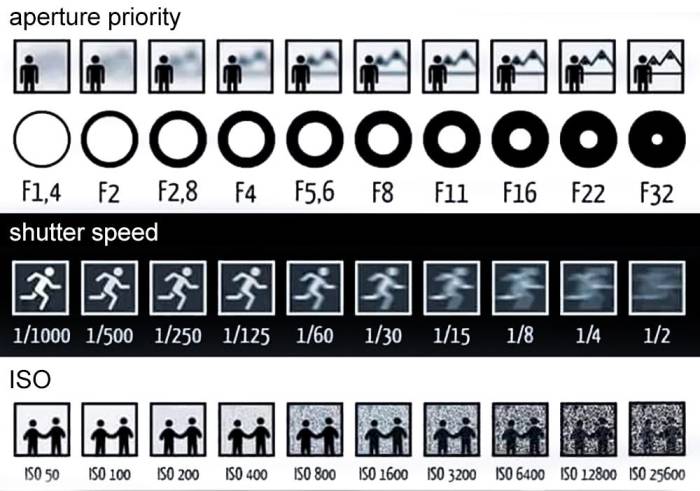
Understanding aperture, shutter speed, and ISO for night shots is crucial for capturing stunning low-light images. Mastering these three elements of the exposure triangle allows photographers to control the amount of light entering the camera, influencing both the brightness and the overall aesthetic of the final photograph. This exploration will delve into the intricacies of each setting, revealing how their interplay shapes the quality and impact of your nighttime photography.
Night photography presents unique challenges, demanding a deeper understanding of camera settings than daytime shooting. This guide will equip you with the knowledge to confidently navigate these challenges, transforming your nighttime images from grainy, blurry disappointments into crisp, evocative masterpieces. We will examine the practical applications of aperture, shutter speed, and ISO in various night photography scenarios, including capturing star trails, cityscapes, and portraits under moonlight. Through clear explanations and practical examples, you will gain the skills necessary to capture the magic of the night.
ISO and its Role in Night Photography
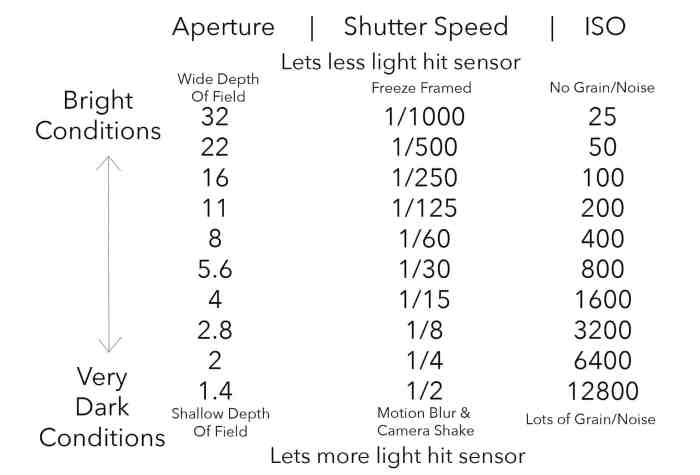
Understanding ISO is crucial for successful night photography. ISO determines the sensitivity of your camera’s sensor to light. Higher ISO values allow you to shoot in darker conditions, but they come with trade-offs in image quality. This section explores the impact of different ISO settings on your night shots.
Image Quality at Different ISO Settings
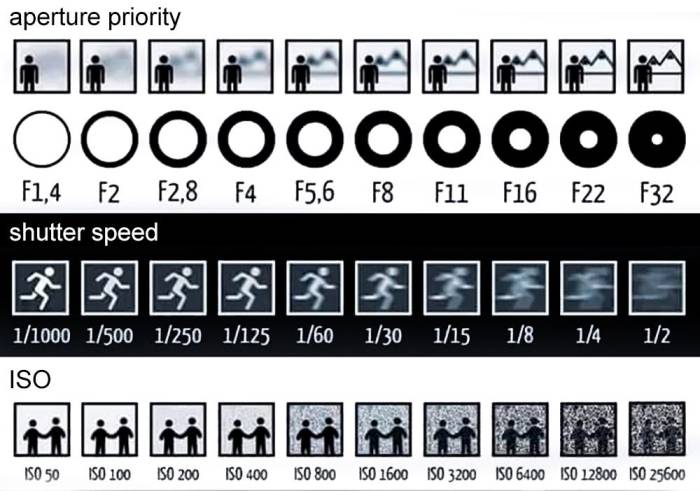
Low light photography necessitates careful consideration of ISO. At lower ISO settings like ISO 100, the image will appear cleaner and sharper, with minimal noise or grain. However, longer exposure times will be needed to capture sufficient light. Increasing the ISO to 800 allows for faster shutter speeds, but you’ll start to notice a subtle increase in digital noise, a grainy texture that reduces image detail. At a high ISO setting like 3200, the image will be brighter, but the noise becomes significantly more prominent, potentially obscuring fine details and impacting the overall image quality. The trade-off is always between image brightness and image cleanliness.
Optimal ISO Range for Minimizing Noise
The optimal ISO range for minimizing noise in night photography generally falls within the lower ISO values of your camera. This typically ranges from ISO 100 to ISO 800, depending on your camera’s capabilities and the specific lighting conditions. Many modern cameras perform well up to ISO 1600, offering a balance between low noise and usable shutter speeds. Pushing beyond ISO 1600 often results in noticeable noise, even with noise reduction processing. Always prioritize shooting at the lowest ISO possible while still achieving a usable shutter speed.
Adjusting ISO Based on Available Light and Desired Image Quality
Adjusting your ISO is a dynamic process that requires observation and adaptation. Begin by setting your ISO to the lowest value (e.g., ISO 100) and taking a test shot. If the image is too dark, gradually increase the ISO in increments (e.g., 200, 400, 800, 1600) while monitoring the resulting image quality. If noise becomes too distracting, reduce the ISO and consider using a tripod or other techniques to achieve longer exposure times. The goal is to find the sweet spot—the highest ISO that produces an acceptable level of noise for your specific needs.
Impact of Different ISO Levels on Image Noise and Dynamic Range
| ISO Setting | Noise Level | Dynamic Range |
|---|---|---|
| ISO 100 | Minimal noise, very clean image | High dynamic range |
| ISO 800 | Low to moderate noise, visible upon close inspection | Slightly reduced dynamic range |
| ISO 3200 | High noise, significant grain, detail loss | Noticeably reduced dynamic range |
The Exposure Triangle Interplay at Night
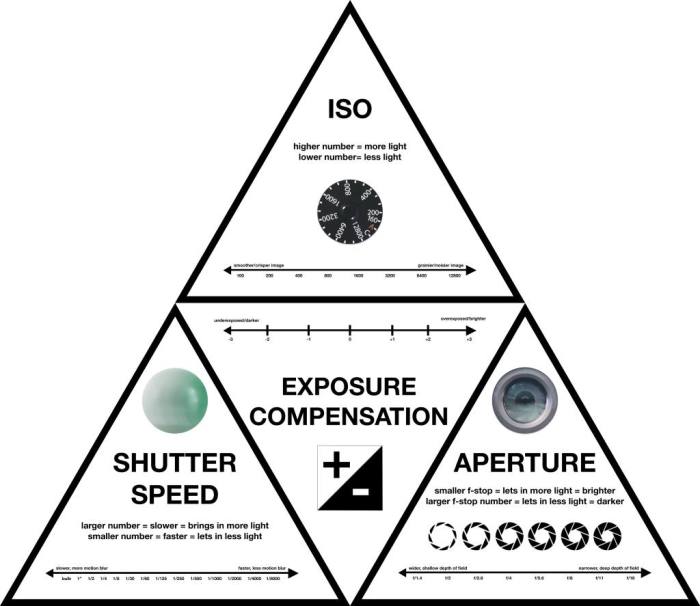
Night photography presents unique challenges to achieving a well-exposed image. Unlike daytime shooting, where ample light is available, nighttime necessitates a careful balancing act between aperture, shutter speed, and ISO to capture the scene accurately. Understanding their interplay is crucial for success. Each setting directly influences the others, creating a delicate relationship that must be managed effectively.
The exposure triangle—aperture, shutter speed, and ISO—works in concert to determine the overall brightness of your image. At night, the limited light forces you to make compromises. Increasing ISO boosts sensitivity, allowing for faster shutter speeds or smaller apertures. However, higher ISO values often introduce more digital noise, impacting image quality. Conversely, widening the aperture (using a lower f-number) lets in more light, potentially enabling a lower ISO and/or faster shutter speed. However, a very wide aperture might result in a shallow depth of field, blurring parts of the image. Similarly, using a slower shutter speed allows more light to reach the sensor, but it increases the risk of camera shake and motion blur, especially without a tripod. The key is to find the optimal balance between these three elements to minimize noise while preventing blur and achieving a correctly exposed image.
Aperture’s Role in Night Exposure
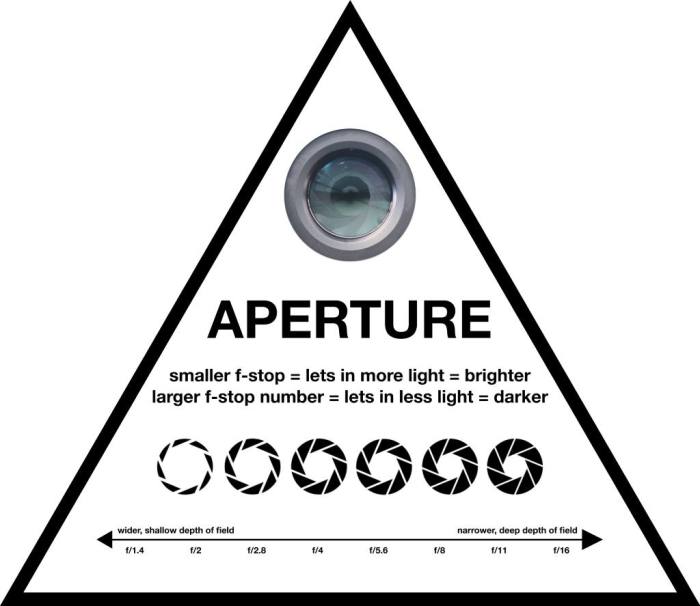
Aperture controls the amount of light entering the camera lens. A wider aperture (smaller f-number, e.g., f/1.4, f/2.8) allows more light to reach the sensor, useful in low-light conditions. A narrower aperture (larger f-number, e.g., f/8, f/11) reduces the amount of light, resulting in a darker image. However, wider apertures often lead to shallower depth of field, meaning only a small portion of the image will be in sharp focus. This can be creatively used for isolating subjects against a blurred background, a common technique in night portraiture. For landscapes, a narrower aperture may be preferred to maintain sharpness across the entire scene. Consider the creative impact of depth of field when choosing your aperture setting.
Shutter Speed’s Influence on Night Photography
Shutter speed determines how long the camera’s sensor is exposed to light. Slower shutter speeds (e.g., 1/30s, 1s, or even longer) allow more light to hit the sensor, beneficial in low light. However, slower shutter speeds increase the risk of camera shake and motion blur, especially if you are not using a tripod. For sharp images, especially at night, a tripod is almost essential when using slower shutter speeds. Faster shutter speeds (e.g., 1/200s, 1/500s) freeze motion but require more light or a higher ISO to avoid underexposure. The choice depends on the desired effect—freezing motion or creating light trails.
Decision-Making Flowchart for Night Photography Settings
Choosing the right combination of aperture, shutter speed, and ISO requires careful consideration. The following flowchart Artikels a logical decision-making process:
[Imagine a flowchart here. It would start with a diamond shape: “Sufficient Light?”. If yes, proceed to a rectangle: “Use lower ISO, adjust aperture and shutter speed as needed”. If no, proceed to a rectangle: “Increase ISO (within acceptable noise level)”. Then, a diamond shape: “Sharpness critical?”. If yes, proceed to a rectangle: “Choose narrower aperture (higher f-number), use tripod, adjust shutter speed accordingly”. If no, proceed to a rectangle: “Choose wider aperture (lower f-number), use tripod if necessary, adjust shutter speed accordingly”. Finally, a rectangle: “Review and adjust as needed based on the image preview”.]
In this topic, you find that is esim technology secure and reliable compared to physical sim is very useful.
Focusing Techniques for Night Shots
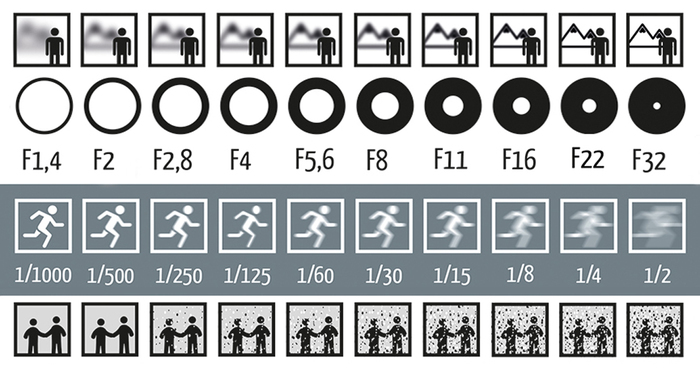
Achieving sharp focus at night presents unique challenges due to the limited light available. The lack of sufficient illumination can significantly impact your camera’s autofocus system and make manual focusing more demanding. Understanding different focusing techniques and their respective strengths and weaknesses is crucial for capturing crisp, well-defined images in low-light conditions.
Manual focus, autofocus, and live view each offer distinct advantages and disadvantages in night photography. The best approach often depends on the specific subject, the available light, and the photographer’s comfort level with different techniques. Careful consideration of these factors is key to successful night photography.
Manual Focus
Manual focus offers precise control over the focus point, especially beneficial when dealing with subjects that are difficult for autofocus to acquire. This technique requires a good understanding of your camera’s focusing ring and potentially the use of a focusing aid like a magnifying glass on the viewfinder or a high magnification on your LCD screen. By carefully adjusting the focus ring until the subject is sharp, you can ensure perfect focus even in challenging low-light situations. The process is slower than autofocus but often yields more accurate results, especially when shooting stationary subjects like landscapes or cityscapes.
Autofocus Techniques in Low Light
Autofocus systems struggle in low light, often hunting for focus or failing to achieve a sharp image. However, several strategies can improve autofocus performance at night. Many modern cameras offer specific low-light autofocus modes designed to enhance accuracy in dim conditions. These modes often utilize more sensitive autofocus sensors and algorithms to acquire focus more reliably. Furthermore, using a wider aperture (lower f-number) increases the amount of light reaching the sensor, aiding autofocus. Finally, utilizing a tripod to keep the camera perfectly still helps the autofocus system by eliminating camera shake, a major contributor to focusing errors.
Live View Focusing
Live view, available on most DSLRs and mirrorless cameras, provides a real-time view of the scene on the LCD screen. This feature is particularly useful for night photography as it allows for precise focus adjustments using magnification. Zooming in on the subject on the LCD screen allows for detailed examination of the focus point, making it easier to achieve sharp focus even in low-light. The magnified view eliminates the need to rely on the often dim and less accurate viewfinder image, making it a more reliable focusing method in the dark.
A Step-by-Step Guide to Achieving Sharp Focus at Night
- Choose your focusing technique: Decide whether manual focus, autofocus with low-light mode, or live view focusing is most suitable for your subject and shooting conditions.
- Use a tripod: Stabilizing your camera eliminates camera shake, crucial for sharp images in low light. A sturdy tripod minimizes vibrations, allowing for precise focusing and longer exposure times.
- Set your aperture: Select a wide aperture (low f-number, such as f/1.4, f/2, or f/2.8) to maximize the amount of light reaching the sensor, improving autofocus performance and allowing for faster shutter speeds.
- Utilize autofocus aids (if applicable): Employ your camera’s low-light autofocus mode, focus assist lamp (if available), or utilize contrast-detect autofocus in live view.
- Use live view magnification: If using live view, zoom in on your subject to ensure critical focus before taking the shot. This allows for precise manual focus adjustment or confirmation of autofocus accuracy.
- Use a remote shutter release: This minimizes camera shake caused by pressing the shutter button, further enhancing image sharpness.
- Shoot in RAW format: RAW files contain more image data, providing greater flexibility for post-processing adjustments, allowing you to recover details and improve sharpness if needed.
Overcoming Low-Light Focusing Challenges
Low-light conditions present several challenges to focusing, including slow autofocus speeds, reduced contrast, and difficulty in judging focus through the viewfinder. However, by utilizing the techniques Artikeld above, these difficulties can be largely mitigated. Focusing aids like a headlamp or external light source can be helpful in providing supplemental illumination for autofocus, but care must be taken to avoid overexposing the image. Practicing focusing techniques in various low-light situations will improve your skills and build confidence in achieving sharp images at night. Remember that patience and practice are key to mastering night photography.
Post-Processing Night Photography
Night photography often requires significant post-processing to reveal the scene’s full potential. Raw files, offering greater dynamic range and detail, are highly recommended for this purpose. The goal is to recover shadow detail, manage highlights, and enhance the overall mood and impact of the image. Careful manipulation of brightness, contrast, and noise reduction is crucial for achieving professional-looking results.
Post-processing techniques for night photography allow photographers to refine their images, bringing out details often lost in the low-light conditions of nighttime shooting. It’s a crucial step in achieving the desired aesthetic, whether it’s a realistic representation of the scene or a more stylized and artistic interpretation.
Adjusting Brightness, Contrast, and Other Parameters
Brightness and contrast adjustments are fundamental. Increasing brightness reveals details in dark areas, while carefully managing contrast helps define the separation between light and shadow, preventing the image from appearing flat or washed out. Other parameters like shadows and highlights can be further refined in most image editing software (such as Adobe Lightroom or Photoshop) to target specific areas needing adjustments. For example, selectively brightening the shadows might reveal details in a dark building, while reducing highlights might prevent overexposed areas from losing detail. Saturation can be adjusted to enhance or subdue colors, adding to the overall mood of the image. Vibrance is often preferred over saturation, as it selectively boosts less saturated colors, preventing over-saturation of already vibrant colors.
Reducing Noise and Enhancing Details
Night photography often introduces noise, particularly in high-ISO images. Noise reduction tools within image editing software are designed to minimize this graininess without sacrificing too much detail. It’s a balancing act; too much noise reduction can result in a loss of fine details and a softer image. Many programs offer adjustable noise reduction settings, allowing for fine-tuning based on the image’s characteristics. Sharpening tools can enhance details and add crispness, but should be used subtly to avoid creating unnatural artifacts. Careful application of both noise reduction and sharpening is essential to achieving a clean and detailed final image. For instance, using a noise reduction filter with a lower strength and then selectively sharpening areas of focus will help preserve detail and reduce noise effectively.
Creating Different Moods and Effects, Understanding aperture, shutter speed, and iso for night shots
Post-processing offers significant creative control in shaping the mood and style of a night photograph. Techniques like selective color grading can dramatically alter the atmosphere, shifting the overall tone to be warmer, cooler, or more dramatic. The use of vignettes, darkening the corners of the image, can draw attention to the central subject and add depth. For more advanced effects, tools can simulate different film stocks or introduce creative filters.
Creating star trails, for example, requires combining multiple long-exposure shots of the night sky in post-processing software using stacking techniques. Light painting, where light sources are moved during a long exposure, can be enhanced by adjusting the brightness and contrast of the painted light elements to emphasize specific details or create interesting patterns. In both cases, the software allows for precise adjustments to highlight the key elements of the final image, making the effect more striking.
Equipment Considerations for Night Photography
Night photography presents unique challenges, demanding specific equipment to capture stunning images in low-light conditions. The right tools significantly impact the quality and feasibility of your night shots, allowing you to overcome the limitations of darkness and achieve the results you envision. Careful consideration of your equipment is crucial for success.
The choice of camera, lens, and supporting accessories directly affects the final image quality. Factors such as sensor size, lens aperture, and image stabilization all play a critical role in capturing sharp, well-exposed night scenes. Furthermore, the stability provided by a tripod and the precision of a remote shutter release are essential for avoiding blurry images caused by camera shake during long exposures.
Essential Equipment for Night Photography
A robust set of equipment is crucial for successful night photography. The combination of a sturdy tripod, a remote shutter release, and appropriate lenses allows photographers to overcome the inherent difficulties of shooting in low light. Without these tools, achieving sharp, well-exposed images becomes significantly more challenging.
The following list details essential equipment:
- Tripod: A sturdy tripod is paramount for minimizing camera shake during long exposures, which are frequently necessary in night photography. A heavy-duty tripod with adjustable legs and a stable head is ideal for ensuring sharp images. The tripod’s stability is directly proportional to the quality of the final image, especially with longer focal length lenses.
- Remote Shutter Release: A remote shutter release, either wired or wireless, prevents camera shake caused by pressing the shutter button manually. This is particularly important during long exposures, where even slight vibrations can lead to blurry images. Remote releases allow for more precise control over exposure and eliminate the risk of accidental movement.
- Extra Batteries: Night photography often involves extended shooting sessions, consuming more battery power than daytime photography. Carrying extra fully charged batteries ensures you won’t miss crucial shots due to a dead battery.
Choosing the Right Camera and Lens for Night Photography
Camera and lens selection significantly influences the outcome of your night photography. Factors such as sensor size, lens aperture, and image stabilization capabilities should be carefully considered. The right combination will allow you to capture sharp, detailed images even in very low light conditions.
Key aspects to consider are:
- Sensor Size: Larger sensors, such as those found in full-frame cameras, generally perform better in low light due to their larger photosites, which gather more light. This results in less noise and better image quality.
- Lens Aperture: A wide maximum aperture (e.g., f/1.4, f/1.8, or f/2.8) allows more light to reach the sensor, enabling faster shutter speeds and lower ISO settings, reducing noise and improving image sharpness. Fast lenses are crucial for capturing sharp images in low-light environments.
- Image Stabilization: Image stabilization (IS) or Vibration Reduction (VR) technology helps compensate for camera shake, particularly beneficial during long exposures at night. This feature significantly improves the sharpness of your images, especially when hand-holding the camera (though a tripod is still recommended).
Benefits of Using a Full-Frame Camera Sensor for Night Photography
Full-frame cameras offer several advantages for night photography compared to cameras with smaller sensors (APS-C, Micro Four Thirds, etc.). The larger sensor size translates to superior low-light performance, resulting in cleaner images with less noise. This is because the larger photosites on a full-frame sensor can capture more light, allowing for lower ISO settings and reduced noise.
Specifically, the benefits include:
- Reduced Noise: Full-frame sensors generally produce images with less noise at higher ISO settings, crucial for night photography where higher ISO values are often necessary.
- Better Dynamic Range: Full-frame sensors typically offer a wider dynamic range, capturing more detail in both highlights and shadows. This is particularly beneficial in night scenes with significant contrast between bright lights and dark areas.
- Improved Low-Light Performance: The larger sensor size allows for more light gathering, resulting in brighter images with less need for high ISO settings and consequently less noise.
Successfully navigating the complexities of aperture, shutter speed, and ISO in night photography unlocks a world of creative possibilities. By understanding the interplay between these three elements, photographers can confidently control exposure, sharpness, and the overall mood of their images. Remember that practice is key; experiment with different settings to discover your own unique style and capture the beauty of the night sky and city lights in all their glory. Embrace the challenges, and let your creativity illuminate the darkness.
Q&A: Understanding Aperture, Shutter Speed, And Iso For Night Shots
What is the best lens for night photography?
Fast lenses (with wide maximum apertures like f/1.4 or f/2.8) are ideal for night photography because they allow more light to reach the sensor.
How can I avoid blurry night photos?
Use a tripod to eliminate camera shake, employ a remote shutter release or self-timer, and consider using a higher ISO (within reason to manage noise).
What is the difference between RAW and JPEG for night photography?
RAW files offer greater flexibility for post-processing, allowing for more noise reduction and detail recovery. JPEGs are smaller but have less editing latitude.
How do I focus accurately in the dark?
Use manual focus with live view magnification, or utilize autofocus with a bright focusing aid like a flashlight or headlamp.

