“plant propagation guide
- The Kaleidoscope Of Blooms: A Comprehensive Guide To The Best Flowering Plants For Every Garden
- Winter Friendly Plants
- Outdoor Plants
- Low Maintenance Outdoor Plants
- DIY Plant Pots
Table of Content
- 1 The Comprehensive Guide to Plant Propagation: Multiplying Your Green Oasis
- 1.1 Why Propagate? The Multifaceted Benefits
- 1.2 Essential Principles for Successful Propagation
- 1.3 Methods of Plant Propagation
- 1.3.1 I. Sexual Propagation: Growing from Seed
- 1.3.2 II. Asexual (Vegetative) Propagation
- 1.4 A. Cuttings
The Comprehensive Guide to Plant Propagation: Multiplying Your Green Oasis
The world of gardening is replete with wonders, but few are as rewarding and captivating as plant propagation. It’s the art and science of creating new plants from existing ones, a horticultural alchemy that allows you to multiply your favorite specimens, share them with friends, save money, and even preserve rare varieties. Whether you’re a seasoned gardener or a curious beginner, understanding the principles and techniques of plant propagation opens up a new dimension of green possibilities.
This comprehensive guide will delve into the various methods of plant propagation, from the age-old practice of growing from seed to the more intricate techniques of cuttings, division, and layering. We’ll cover the essential tools, environmental considerations, and troubleshooting tips to ensure your propagation endeavors are met with success.
Why Propagate? The Multifaceted Benefits
Before we dive into the ‘how-to,’ let’s explore the compelling reasons why gardeners embrace plant propagation:
- Cost-Effectiveness: Purchasing new plants can be expensive, especially if you desire many of the same variety. Propagating allows you to expand your collection for free, using material from plants you already own or can acquire easily.
- Genetic Duplication: Asexual propagation methods (like cuttings or division) create exact genetic clones of the parent plant. This is invaluable if you want to reproduce a plant with specific desirable traits – a unique flower color, a particularly vigorous growth habit, or exceptional fruit quality – ensuring the offspring will possess the same characteristics.
- Sharing and Gifting: Propagating plants provides an endless supply of thoughtful, personalized gifts for friends, family, and fellow gardening enthusiasts.
- Preservation of Rare or Sentimental Plants: If you have an heirloom plant, a rare variety, or a plant with sentimental value, propagation ensures its lineage continues, safeguarding it against loss.
- Rejuvenation: Some plants become leggy or less vigorous over time. Propagating new plants from healthy sections can rejuvenate your collection.
- Learning and Connection: The process itself is deeply satisfying. Watching a tiny seed sprout or a leafless cutting develop roots is a profound connection to the cycle of life and a continuous learning experience.

Essential Principles for Successful Propagation
Regardless of the method you choose, a few fundamental principles underpin all successful propagation efforts:

- Hygiene is Paramount: Sterility prevents the spread of diseases and fungi that can quickly decimate young plants or rooting cuttings.
- Sterilize Tools: Always use clean, sharp pruning shears, knives, or razor blades. Disinfect them with rubbing alcohol (70% isopropyl alcohol) or a 10% bleach solution between uses, especially when moving between different plants.
- Cleanliness of Mediums and Containers: Use new, sterile potting mix or a propagation-specific medium. Wash and sterilize pots, trays, and domes, even if they appear clean.
- Proper Rooting Medium: The medium provides physical support, moisture retention, and aeration.
- Seed Starting Mix: Fine-textured, sterile, and well-draining, designed for delicate seedlings.
- Perlite: Volcanic rock, lightweight, provides excellent aeration and drainage.
- Vermiculite: Hydrated mineral, holds moisture and nutrients, provides good aeration.
- Coarse Sand: Improves drainage, often mixed with other components.
- Sphagnum Moss: Excellent for moisture retention, often used for air layering or seed germination.
- Coco Coir: Sustainable alternative to peat moss, good water retention and aeration.
- For cuttings, a mix of equal parts perlite and peat moss (or coco coir) is often ideal.
- Environmental Control: Young plants and cuttings are highly sensitive to their surroundings.
- Light: Most young plants and rooting cuttings require bright, indirect light. Direct, harsh sun can scorch delicate foliage. Grow lights are excellent for consistent, controlled light.
- Humidity: High humidity is crucial for cuttings to prevent desiccation before roots form. Humidity domes, clear plastic bags, or terrariums can create the necessary moist environment.
- Temperature: Consistent, warm temperatures (typically 65-75°F or 18-24°C) are ideal for root development and germination. Heating mats can be very beneficial.
- Air Circulation: While humidity is important, stagnant air can lead to fungal issues. Ensure some air movement, either by occasionally lifting humidity domes or using a gentle fan.
- Rooting Hormones (Optional but Beneficial): These synthetic or natural compounds encourage root development in cuttings. They come in powder, gel, or liquid forms. While not always necessary, they can significantly increase the success rate for many plant types.
Methods of Plant Propagation
Plant propagation is broadly divided into two categories: Sexual and Asexual (Vegetative).
I. Sexual Propagation: Growing from Seed
This is nature’s primary method for reproduction, involving the fusion of male and female gametes to create a genetically unique offspring.
Advantages:
- Produces a large number of plants relatively cheaply.
- Introduces genetic diversity, potentially leading to new varieties or improved disease resistance.
- Many plants can only be propagated this way (e.g., annuals, many vegetables).
Disadvantages:
- Offspring may not be true to the parent plant (genetic variation).
- Can be slow; plants take longer to reach maturity.
- Some seeds require specific conditions (stratification, scarification) to germinate.
Steps for Seed Propagation:
- Seed Selection and Storage: Use fresh, viable seeds from a reputable source. Store seeds in a cool, dark, dry place to maintain viability.
- Pre-treatment (If Necessary):
- Stratification: Mimics a cold, moist winter period. Mix seeds with damp sand or peat moss in a sealed bag and refrigerate for several weeks or months (e.g., many perennials, trees).
- Scarification: Softens or breaks the hard seed coat to allow water penetration. This can involve nicking the seed with a knife, rubbing it with sandpaper, or soaking it in warm water (e.g., sweet peas, morning glories).
- Sowing:
- Containers: Use clean seed trays, cell packs, or small pots with drainage holes.
- Medium: Fill containers with a sterile, fine-textured seed-starting mix. Lightly moisten the mix before sowing.
- Depth: A general rule is to sow seeds at a depth twice their diameter. Very fine seeds can be sprinkled on the surface.
- Spacing: Sow seeds thinly to prevent overcrowding and reduce the risk of damping-off.
- Post-Sowing Care:
- Watering: Water gently from the bottom or use a fine mist sprayer to avoid disturbing seeds. Keep the medium consistently moist but not waterlogged.
- Light: Most seeds germinate best in bright, indirect light. Once sprouted, seedlings need plenty of light to prevent legginess. Use grow lights if natural light is insufficient.
- Temperature: Maintain the ideal temperature range for your specific seeds (often slightly warmer than room temperature). Heating mats can be beneficial.
- Humidity: Cover trays with a clear dome or plastic wrap to maintain humidity until germination. Remove covers once seedlings emerge to improve air circulation.
- Pricking Out and Transplanting:
- Once seedlings develop their first set of true leaves (the leaves that appear after the initial cotyledons), they are ready to be "pricked out" or transplanted into individual pots.
- Handle seedlings carefully by their leaves (not stems) to avoid damage.
- Plant into a slightly richer potting mix.
II. Asexual (Vegetative) Propagation
This method involves taking a part of a single parent plant (stem, leaf, root) and encouraging it to form a new, genetically identical plant.
Advantages:
- Produces clones true to the parent plant.
- Faster way to get a mature plant than from seed for many species.
- Can be done with plants that don’t produce viable seeds or are difficult from seed.
Disadvantages:
- Limited genetic diversity, making the offspring susceptible to the same diseases or pests as the parent.
- Requires more parent material.
- Some methods can be more labor-intensive.
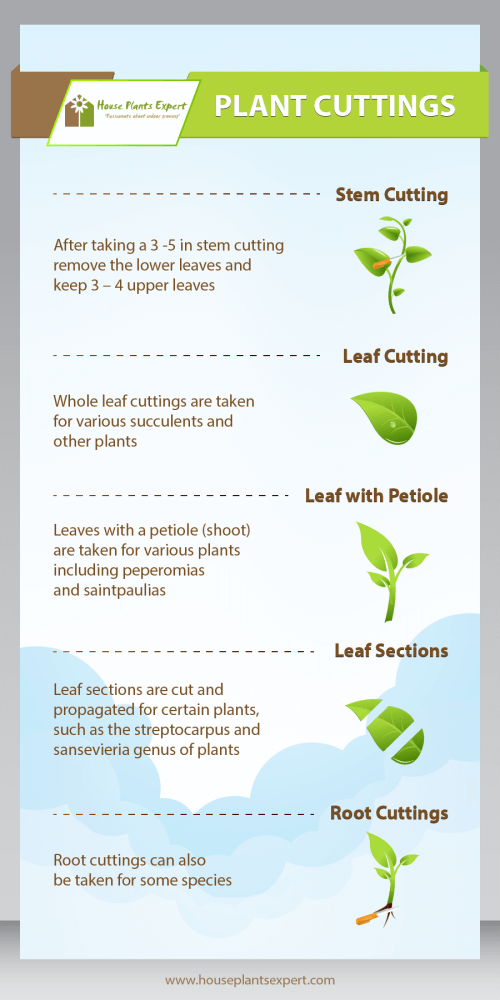
A. Cuttings
Taking cuttings is one of the most popular and effective asexual propagation methods. It involves severing a section of a plant and encouraging it to root.
General Steps for Taking Cuttings:
- Timing: Take cuttings from healthy, vigorous parent plants. The best time varies by plant type and cutting type (see below).
- Preparation: Use sharp, sterile tools. Make clean cuts to minimize damage and disease entry.
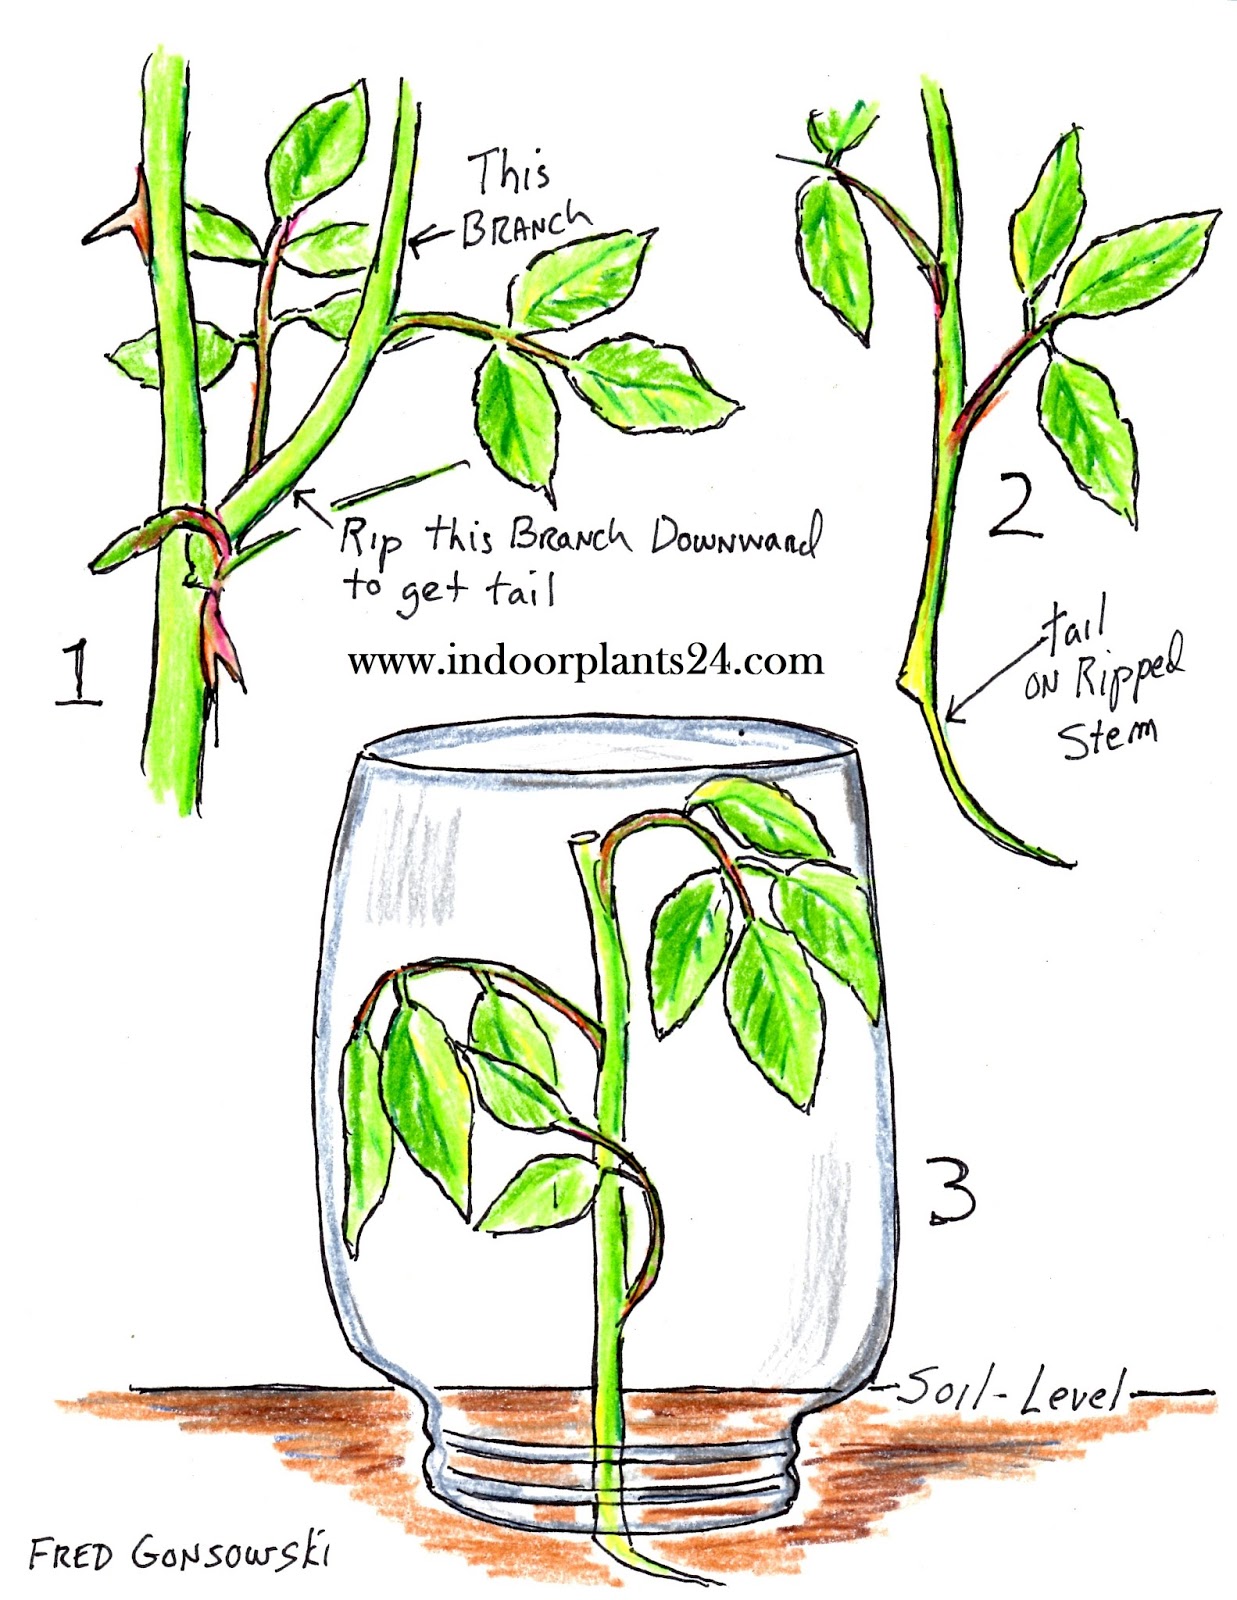
- Taking the Cutting:
- Select a stem with at least 2-3 nodes (where leaves or branches emerge).
- Make a cut just below a node, as this area often contains a higher concentration of rooting hormones.
- Remove lower leaves that would be submerged in the rooting medium to prevent rot.
- For larger leaves, you can cut them in half horizontally to reduce moisture loss.
- Rooting Hormone (Optional): Dip the cut end of the stem into rooting hormone powder or gel. Tap off excess.
- Planting: Insert the cutting into a pre-moistened, well-draining rooting medium (e.g., perlite/peat mix, sand, water). Ensure at least one node is buried.
- Environment: Place cuttings in a warm location with bright, indirect light. Create a humid environment using a humidity dome, plastic bag, or misting regularly.
- Care: Keep the
